I needed a jewelry display for the show last weekend. I purchased a bunch of old dolls at the Long Beach flea back in April and decided to get busy and make them. this is inspired by Lisa Loria's Bling Babies. I looked on her blog and Pinterest boards for a tutorial or on line instruction guide by her with no luck. Armed with imagination and a vague idea of what I wanted, I embarked on my journey.


I knew I wanted something tall. I found this gold brass candlestick at a garage sale and sprayed it with high gloss white. It is a strong heavy base and perfect for what I needed. You need a heavy weighted bottom to hold all the jewelry. I had a lampshade that would be perfect. ( I knew there was a reason for hauling it back and fourth in my 2 moves to OC) I removed the old yucky plastic from the shade and painted it pale blue, more to prevent further rust than anything else.

I used a kitchen knife to cut the pelvis off of the doll. If you are using a composition doll, you may need to use a hacksaw or a table saw if you aren't scared of power tools.

This little doll's hair was seriously jacked up. Like the one above more or less. I washed her hair and used about 1/3 cup of fabric softener to comb it smooth. Fabric softener is perfect for synthetic doll hair (another Pinterest tip) It took a while, but it came out really silky and soft. Just be patient and pour the softener on the hair a little at a time, working out small sections of tangles bit by bit. Now she looks like my beautiful sister in law Krissy.


I cut chicken wire to cover the shade in the shape of the panels and then tied it on with twill tape and seam binding. I covered all of this with the selvage edge of the fabric that had a cool sparkly fringe look to it.

To style the hair, get some Halloween straws from the dollar store, (they are larger than traditional straws.) Cut them into sections,, and roll the hair. Since I wanted Marie Antoinette sausage curls, I wound the hair on in a vertical fashion and pushed a straight pin through the scalp to hold it in place. Synthetic doll hair is not easy to curl. I dunked the head in a bowl of boiling water for 3 minutes, then in ice water for 2 minutes. And let it air dry. The hair got kind of fried, but it was still workable. I would do less time in the hot water next time.

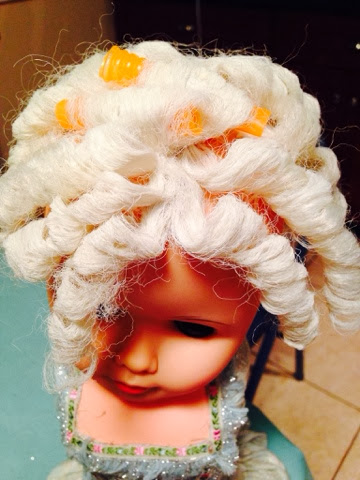
When removing the curls, remove the pin and pull the straw straight down. If you unroll it any other way, you will not have sausage curls. I recommend leaving the hair for last. I kept it in curlers until I had attached the bust to a wood circle and covered it. It prevents it from getting messed up.
My dad helped me cut a
circle the size I needed for the top of the candlestick. He drilled her
to the wood base, and then drilled holes for me to run wires through so
i could secure her to the top, yet make her removable for transporting.
It needed to be secure to hold the weight of all the jewelry. Using the bodice to an American Girl dress as a pattern, I modified it
to fit this dolls body, sewed the shoulders and side seams, and glued it
down her back. I cut a length af fabric twice the circumference of the
circle, pinch pleated carthige pleats that would lay flat, then glued
the skirt to the waist.


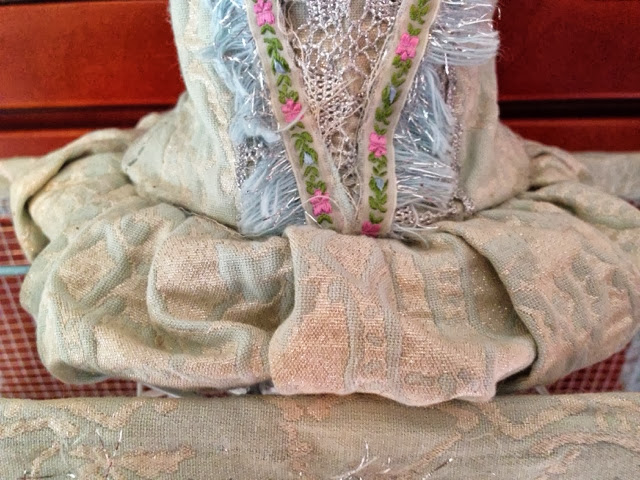
Before gluing the underside, I ran the wire through the pre drilled holes. The bodice bottom was turned under and glued down to hide the pleats and give it a more finished look. On the under side, I glued down the seam first, then went across the board and glued the opposite side, avoiding the wires, making sure they stayed exposed. I continued around in quarter turn increments until I had it glued down completely.


I took a piece of doweling, wrapped quilt batting around it and then sewed a long tube out of matching fabric. I hot glued the ends down to the doweling.


I am really happy with how she turned out. I met Lisa at the show, and told her about making it, and planning to blog it. She was very sweet and generous. She complimented me on mine, she liked the chicken wire shade for earrings. She told me someone asked her if she had made it. I take that as a compliment that someone even thought it MIGHT have been made by her. She says she doesn't make them very often anymore. Like many artists, you do something for a while, and your work evolves and you move on to different things. If you do ever get a chance to take a class with her, do it... she is just delightful! I wish I had known all her tips and tricks while trying to figure out this whole project. It is not a simple one by any means, It was completed a few hours at a time over a week. Drying of paint and doll hair took some of it up. I would say you could probably finish it in a weekend, Friday nite thru Sunday. I am going to Alameda Flea on Sunday to try to find some more dolls at a good price to make more. I love how little space they take up, yet how much they actually hold.
I think she is lovely. The only thing she needs now is her own little miniature pearl necklace. I am off to make her one now...


1 comment:
Wow she looks great! She is very interesting.
Post a Comment