Sunday, February 27, 2011
Repurposed dresser and cup shelf
I have a lovely teacup collection that has been stored in a box in the garage for 5 years. I have a living room with no furniture in it, and no space in the dining room for a table... So I had an idea to somehow make a dining room out of the living room... I could take this $5 dresser I bought at my favorite thrift store, and somehow create a space to display some of my teacups. and then scrounge around and see what else I could come up with to make a dining room.
I puttied the holes in the dresser top and drawer fronts and had Zack sand the whole things down with a sander. Then guess what I did? Yep... painted it white... and spray painted the oxidixed bubbled up silver metal knobs blue... Joke all you want family members, but it looks very cool now....
I found this oak cupshelf I have had for years in the back of the garage... pulled it out and painted it white too... and Ta-Da... a great teacup display and place to store all my tea party goods. Napkins, teaspoons and strainers, tablecloths and linens, candlesticks and more are stored in the dresser drawers. Now when I have my OC art sister friends over for art day, I have a place to store all my tea party stuff! I LOVE the flea market style!
Friday, February 25, 2011
Garden Art
I have been at it again... Dumpster diving for treasures... in the form of plastic bottles, cups and aluminum cans. I used to volunteer at the Depot's transfer station at the recycling center out in Benicia... I HATED to see the amount of plastic and aluminum that they trucked in every day... I think plastic food containers should be outlawed... everywhere. But since it probably won't be, I am trying to think up more creative ways to use it to brighten up our lives, rather than cause more blight.
I am also trying to create some art for my garden with no money... OK, so I splurged on a few cans of spray paint... But a lot of it I got for free at the HazMat facility in Martinez on my last visit there. You can use left over house paint, acrylic paint, glass paint, whatever you have laying around... I like the way the spray paint looks. But be sure to wear a mask if you will be spraying a lot... It is hard on the lungs...
I made these flowers by cutting the top of the can off like this
then I trimmed the rough edges off the cans and bottles like this
Using the pattern on the bottom of the plastic bottles, and by creating my own patterns, I cut strips down the side of the can, bent them out, and then cut petal shapes on the tips.
punched a hole through the middle, ran some wire through and tied it on to a small piece of doweling.
They make a really bright addition to my garden. I can't stop making them, it's addictive!
Friday, February 18, 2011
Vintage Luggage Redux
I collect old suitcases... Unfortunately, it is getting harder and harder to find the really cool ones. Once in a while I come across old hard sided train cases and larger luggage pieces at garage sales. They are usually really ugly and beat up and have very little personality. These three pieces were Navy blue, yellow and burgundy. I wanted a matching 3 piece luggage set that I could use for hauling my art stuff around.
Spray paint is the great equalizer. I LOVE spray paint. Gather up your stencils and anything else you can spray a pattern through, scrapbook laser cuts, lace, plastic tablecloths, paper doilies, rubber rug mats... really think outside the box with this...
I started with white, and layered the stencil down, spritzing the white over the suitcase in random patterns. Then I added pale green, aqua, pink and yellow. The colors seemed a little muted, so I then used a bright royal blue metallic and purple spritzed lightly to make the stencils really pop. The secret to this is the layers. You really need to keep layering one stencil over another to get the depth. If you don't like something, let it dry for a bit, and then spry over it again. Using metallic silver or pearl paint will give you a cool damask effect.
So drag out those old suitcases from the garage, go to the hazardous waste materials restore in your area and pick up spray paint for free, and go to town with all the cool colors and designs and see what you come up with!
The train case in the front left was painted by my daughter Kayleigh. It started life as a black textured leather case. She went for a more goth rock kind of look... she keeps her makeup in it. Next time you see one of these at a yard sale or thrift store, POUNCE on it... they are very cool when done up.
Spray paint is the great equalizer. I LOVE spray paint. Gather up your stencils and anything else you can spray a pattern through, scrapbook laser cuts, lace, plastic tablecloths, paper doilies, rubber rug mats... really think outside the box with this...
I started with white, and layered the stencil down, spritzing the white over the suitcase in random patterns. Then I added pale green, aqua, pink and yellow. The colors seemed a little muted, so I then used a bright royal blue metallic and purple spritzed lightly to make the stencils really pop. The secret to this is the layers. You really need to keep layering one stencil over another to get the depth. If you don't like something, let it dry for a bit, and then spry over it again. Using metallic silver or pearl paint will give you a cool damask effect.
So drag out those old suitcases from the garage, go to the hazardous waste materials restore in your area and pick up spray paint for free, and go to town with all the cool colors and designs and see what you come up with!
The train case in the front left was painted by my daughter Kayleigh. It started life as a black textured leather case. She went for a more goth rock kind of look... she keeps her makeup in it. Next time you see one of these at a yard sale or thrift store, POUNCE on it... they are very cool when done up.
Thursday, February 17, 2011
What would you do.....
Here is my delimma.... I have no artwork hanging in my house, no photos, nothing... I hung a couple of pictures I like, but they don't go with the house... it is a ranch style house with a hideous wallpaper of blue and gray marble texture in the dining room and kitchen wall... All my stuff is green, paintings with green, furniture that is shades of sage and celery green... and lots of white frames... (I had pale yellow walls at my old house and it looked GREAT!) so this blue gray thing just ain't workin' for me... I have one large wall that I thought I could hang the frames on temporarily until I figure out what to do with them, thus killing the proverbial two birds with one stone. Getting the frames out of storage while putting something on the walls... but I am unsure... I would love some advice people... I have posted a previous post on the 15th about the wine and glass cabinet I made in the dining room, and you can see the ugly wallpaper behind it... I need serious decorating help from all you artistical and decorational types... I am good at making the stuff, and merchandising a store, but not when it comes to my home... why is that? Maybe because it is a rental, and I am stuck with this wallpaper as it is... and I really don't like it... maybe I am just feeling stuck in general when it comes to decorating. I am loving the clean uncluttered feel of everything... Having not much stuff to begin with really gives you a clean slate... but it does make it hard when you try to do something with very little... Am I overthinking this?
So far I have come up with 2 possibilities... paint them all black and fill them with family photos in black and white and hang them in a grouping on the wall to create a gallery wall... the other is to paint them the soft aqua blue color I am in love with right now, and hang them all on the wall empty, and just appreciate all the lovely detail on them.... Anyone wanna give me an opinion?
Repurposed Sideboard and shelf unit = china wine and glass cabinet
I got rid of a great china cabinet on Craigslist before I moved, and now have no space to store my china and favorite pieces. My mom was visiting a couple weeks ago, and was scrounging through my garage for things to help me decorate, when she saw this sideboard and shelf unit I had buried in the back of the garage. I said, "Hey mom, what if we put that on top of the sideboard in the kitchen and use it for glasses and wine and stuff?" She measures, and then she and my stepdad brought it in, cleaned it up and did this with it! How great is that? A garage sale sideboard we bought for $40 and had shoved in the garage, along with a bookshelf my neighbor gave me when he moved a couple years ago... 2 unrelated pieces, that when put together, made a very functional and cool looking piece in my dining room! I am stoked! Now I am on a mission to see what else I can make with what I already have lying around! Check back soon for more thrifting and repurposing ideas.
Wednesday, February 16, 2011
Repurposed Tackle Box
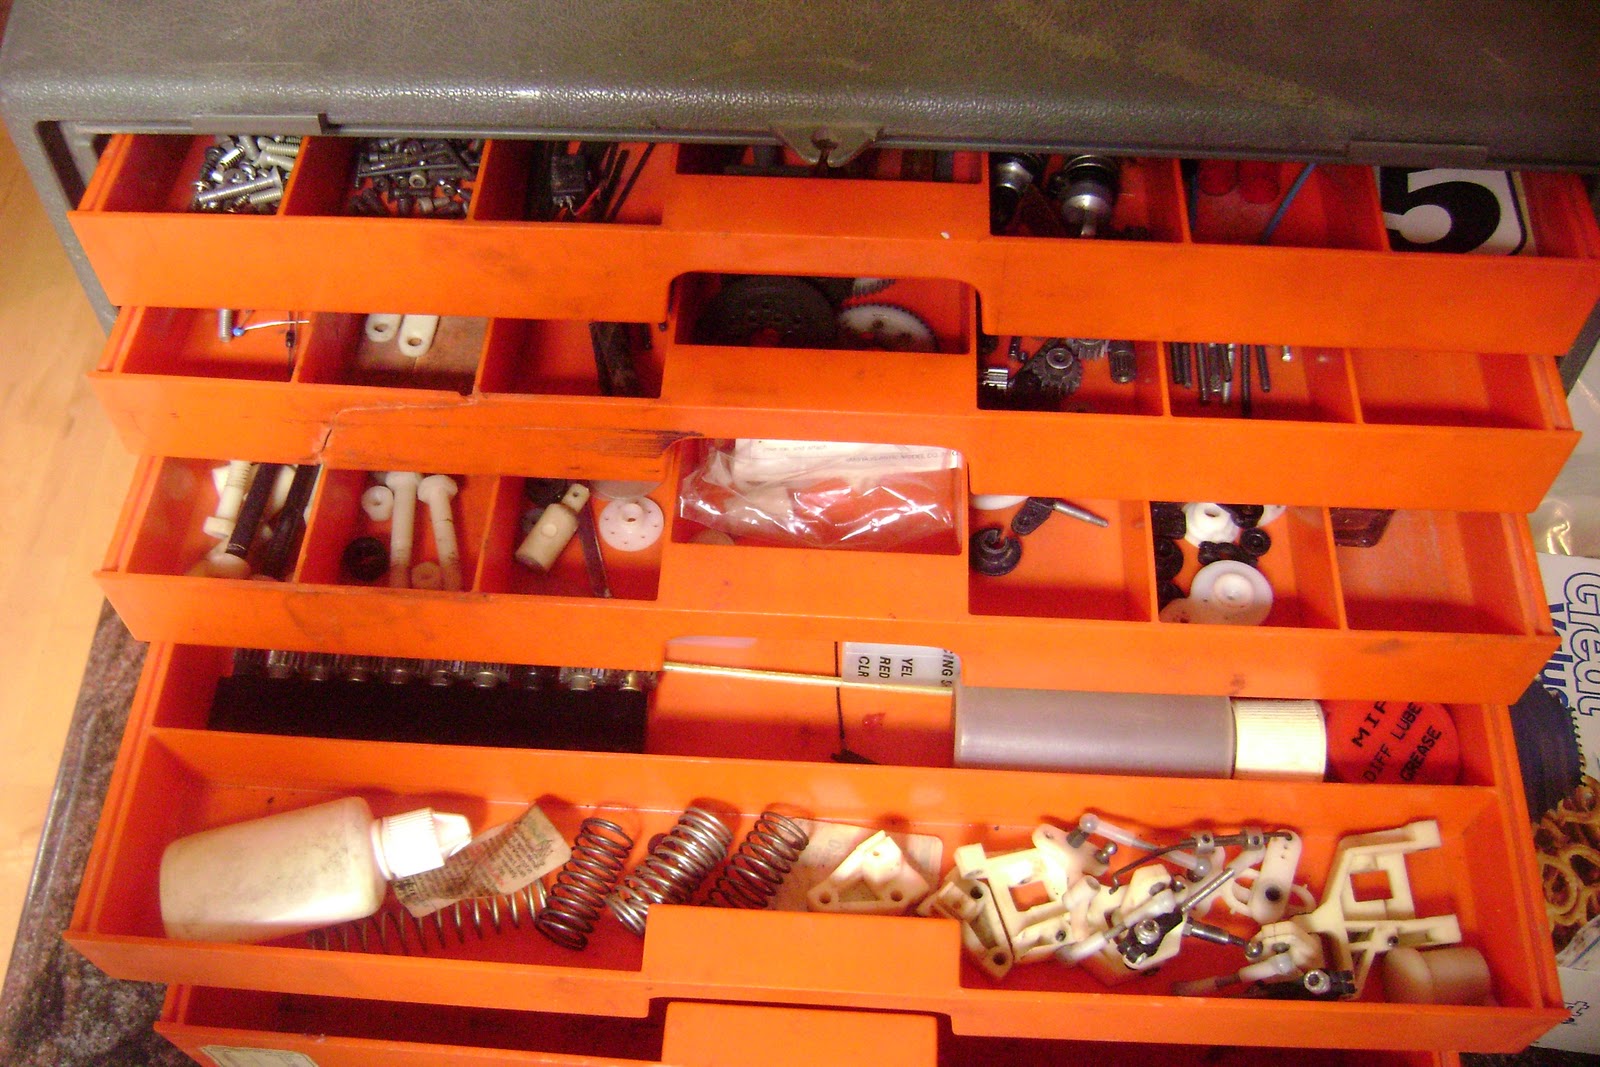
I picked up this tackle box a couple weeks ago at a church rummage sale for $5 It was full of gas powered remote control car parts. This little case had seen a lot of use. I spray painted it white, and then painted the drawers with flat black. Now it is a perfect traveling case for all the art retreats and classes I plan on attending in the future. It holds all my necessary supplies and is compact and portable. So remember next time you see something at a yard sale that you might not usually buy (I always pass by the "guy" stuff) think of it from another perspective. What could I do with that...? It could be an art kit for your kids holding all their crayons, pencils, stickers and such. It could be a jewelry making supplies case... or embellishments for scrapbooking. The possibilities are endless, if you think outside the box.
Tuesday, February 15, 2011
upcycled garden art
How cute are these? I met this lady at Swan Day in Martinez last year. She made all these things from stuff she diverted from landfill... Old broken and chipped plates, soda bottles, water bottles, aluminum cans and golf clubs... I am going to make some to add color to my backyard. I will be posting the results, what I learned while making them, and the actual how to's of doing it step by step in an upcoming post.
Monday, February 14, 2011
Thrifty Valentines Day Treats
I have to check my blog archives. I may have posted this before... I took an old heart shaped box and deconstructed it, covered it with a world map tissue paper and filled it with candy for my husband. I saved the box from a couple of years ago and just reused it again. He didn't care that it was reused and regifted. The contents were new...
And here is something my daughter and I made after seeing this on a blog somewhere. We bought Jolly Rancher flavored candy canes after christmas for like 10 cents a box, layed them in a heart shape and filled them with melted chocolate chips. We put the melted chocolate in a ziploc bag, cut off the corner and squeezed it into the heart. She held the heart together while I squeezed. Then we added a lolipop stick and some colorful sprinkles and made valentines giveaways for all her friends. The kids loved them, being in Jr. High, food and candy are more appreciated than cards. It was easy and so cheap. A great way to repurpose leftover holiday candy. Another thing I do is buy after christmas candy like hersheys kisses and peanut butter cups. I sort out the colors, red, green gold and silver and use the gold and silver for New Years, the red for Valentines Day and the green for St. Patricks day. If you think ahead, you can really plan it so your party favors and little giftie treats cost almost nothing...
The handmade truffles recipe follows here:
Liquor Truffles
8 oz chocolate (I use the large dark chocolate bars from Trader Joe's)
1 cube of butter at room temperature
1/2 cup liquor (I used Macadamia Nut, but you can use Amaretto, Frangelico or Kaluah)
1 pound of chocolate for coating
Melt 8 oz of chocolate in double boiler. If you don't have one, a metal bowl floated in a pot of boiling water will work just as well. Remove from heat. Be careful not to let ANY water come in contact with the chocolate or it will sieze up and glob together.
Vigorously beat butter in to melted chocolate until light and fluffy (mine never got light and fluffy, but well mixed and it was still ok)
Continue beating slowly and add liquor slowly to chocolate mixture.
Chill for 1-3 hours. I did one hour in the freezer.
Dig a melon baller into the frozen mixture, creating balls and place in a bowl or on a wax paper lined baking sheet and re-freeze. Melt rest of chocolate, and coat frozen truffle balls with melted chocolate. I use 2 bamboo skewers. I stab one into the top of the truffle, dip it, tap off the excess chocolate, and then set on the wax paper lined baking sheet, using the other skewer to hold it in place while I twist the other one out of the truffle.. You must work quickly and leave most of them in the freezer until ready to dip. If you don't tap off the excess, you will have a large "foot" underneath your truffle where the excess chocolate will pool. When ready to decorate, dip top into more melted chocolate (I used white) and then dip immediately into sprinkles. Or cover skewer hole in top with a candy conversation heart or other festive decoration. Place in paper candy cups, available in the treat aisle or at Michaels in the baking section. These truffles are3 really yummy, but for adult consumption only. I will post a non-alcoholic recipe later this week that is great for easter treats.
Wednesday, February 9, 2011
Playing Card ATC's
Artist Trading Cards (ATC's) are very popular at art retreats as trades. I know a lot of artists who trade these cards religiously. It is really cool, to have a little piece of art created by an artist you admire.
I like to use old playing cards as the base for my ATC's. Collect images from your stash that are the right proportion to use on a playing card. I use the decorated side of the card as the back, and put a sticker with my name, the date and if a series, the series number. On the face side of the card, I lightly sand the plastic coating off and gesso the card. I use white, clear or black gesso, depending on my mood that day. Then I use paint, ink, stamps etc to color the background. Sometimes I use a magazine image or patterned paper as the background. Then I collage the rest of the images on the background, finishing with some text cut from an old book.
These can be glued to the front of a handmade card and used to make a lovely greeting card. They can also be used in small frames for home decor. Try a few for yourself and discover how addicting they can be.
I like to use old playing cards as the base for my ATC's. Collect images from your stash that are the right proportion to use on a playing card. I use the decorated side of the card as the back, and put a sticker with my name, the date and if a series, the series number. On the face side of the card, I lightly sand the plastic coating off and gesso the card. I use white, clear or black gesso, depending on my mood that day. Then I use paint, ink, stamps etc to color the background. Sometimes I use a magazine image or patterned paper as the background. Then I collage the rest of the images on the background, finishing with some text cut from an old book.
These can be glued to the front of a handmade card and used to make a lovely greeting card. They can also be used in small frames for home decor. Try a few for yourself and discover how addicting they can be.
Tuesday, February 8, 2011
One World One Heart
UPDATE**** The winners of my giveaway are... Just Jenn Designs, Bliss Angels and Electra. I have notified all the winners by email. Congratulations, and thanks so much to everyone who liked my stuff enough to enter my drawing, and a big thanks to those who are now following me. I love having visitors, and plan on visiting all the blogs of the people who stopped by in the next couple of weeks. Thanks again to everyone!
I am late to post this, but I am participating in the One World One Heart blog giveaway. You can read about it here. I have participated in years past, and it is a great event. I have met some really amazing people over the years through it. Since this is the last one, I would like to be a part of it. I will be giving away 3 prizes from the studio...
A journal made with recycled clothing, ribbons and notebooks.
A soldered glass pendant
A fused glass heart made with dichroic glass (much prettier in person)
All you have to do is post something in the comments section of this post. Names will be drawn randomly and posted on the morning of the 18th, since the event ends on the 17th of February.
I am a mixed media artist living in Orange County California. I recently moved from the San Francisco Bay Area, and I am still in transition. I blog about art, travel, kid crafts, reuse crafts, decorating, and thoughtful musings about life in general. Poke around my blog a bit and see what I am about. Thanks so much for taking the time to visit! I look forward to meeting many of you through your blogs in the coming weeks and months. (I have found it takes a while to really "visit" all the blogs on here during the event)
Monday, February 7, 2011
Spa box made with recycled goods

This beautiful spa box was created with all reused materials. I started out with a pretty box that I could recover with beautiful gift wrap. It had stationery in it, and a cool removable lining that would hold all the spa materials perfectly. I deconstructed the box, and recovered it carefully with gift wrap glued down with soft gel medium. I like gel medium, but you can use wallpaper paste, or glue sticks. Liquid glues cause the gift wrap to bubble... Gel medium is perfect, doesn't wrinkle or bubble. I used a credit card to burnish it down well to the surfaces, and then used heavy gel medium to glue the box back together.
Take some used dryer sheets. Make sure all the softener is off the sheets. I run them through the washer once after using them to dry. This gets any residual softener smell off the sheets. Press them lightly with a low iron and set aside. In a glass bowl combine 1/2 cup of rock salt, 1/4 cup epsom salts, and 1/4 cup existing bath salts that you have laying around. Add a few drops of food coloring to tint the salts the desired color. Add a few drops of essential oil or perfume oil if you have it lying around. Scoop 1/8 cup of the salts onto a dryer sheet. Tie up into a tight bundle. Trim the top of the bundle into a round shape, tie a bow and finish up with a satin rose glued on with a glue gun.
Next, take some of those watch part tins or mini tins you have in your scrapbooking stash that held eyelets back in the day, and fill each one with different kinds of bath salts. I have TONS of different kinds of mud bath, clay mud mask, healing herbal bath etc. You can use epsom salts tinted different colors if you don't have any bath supplies at home. You can get a 1/2 gallon of epsom salts at the Dollar Store. I cut strips off of one of the dryer sheets and rolled it on my pants to create a shabby looking ribbon/twine. Glue a punched circle of the coordinating gift wrap on the top of the tin, then tie it up like a little package, finish off with satin rose. Write the name of the bath product on the bottom of the tin. Now dig out those hotel toiletries you have laying in the bottom of the bathroom drawer, and cut matching paper to cover the existing labels. Glue the papers on to the toiletries.
Spray paint some poker chips with gold paint, punch a circle out and write the name of the product on the poker chip tag. You can cut circles out of cardstock or chipboard if you prefer. Tie label tags around the neck of the bottles, glue ribbons down with a dot of hot glue and embellish with roses.
Arrange items inside box, tie with a big bow and give to a friend who really needs some pampering. These gifts are always a big hit, and people are blown away that you made it all... Start looking for boxes and little containers at yard sales, and around your house that could be used for a similar project.
Saturday, January 15, 2011
Placemat Beads
I love to buy placemats at the local discount and thrift stores. Ross and TJ Maxx seem to usually carry an interesting assortment. But I buy them wherever I find them. Usually one placemat will cost between $1.99 and $10 depending on the material it is made from. But you will get over 100 pieces from one mat. I also buy purses, trivets, coasters etc. from thrift stores and garage sales and deconstruct them for the pieces.
These beads were made from a placemat made with wooden circles. They had brown and black, I bought one of each. I punched out circles with a circle punch sized to fit on top of the wood circles. I glued them down with Gel Medium, and when they were dry, I topped them with Crystal Laquer. You can use Diamond Glaze, gloss gel medium, polymer acrylic, spray varathane, or any kind of glossy sealer. I am so excited to make something with these beads. I will post some projects with them later in the month. Bear in mind when using vintage papers, sometimes the gloss finish changes the look of the paper significantly. You never know what you will get, which is part of what I find so fun about this project. Check out my etsy site if you would like to purchase these beads.
Friday, December 10, 2010
Peanut Brittle
It's the holiday time again, and we are sweet makers, cookie bakers, candy breakers around here... I started making cookies when I was a kid... and still have the cookie book my grandma bought me when I was a teenager and inscribed this lovely note to me... I admit, I was her favorite... I think she tried to make up to my mom through me, but however it happened, she had a special spot for me, and I worshipped her. Baking and making candy always brings me back to those days I spent at her house, testing cookie recipes, learning how to cook standing on a chair pulled up to the stove next to her. She taught me how to make Rouladen when I was in the 3rd grade and I won a blue ribbon at the 4-H cooking contest with it. She was so proud!
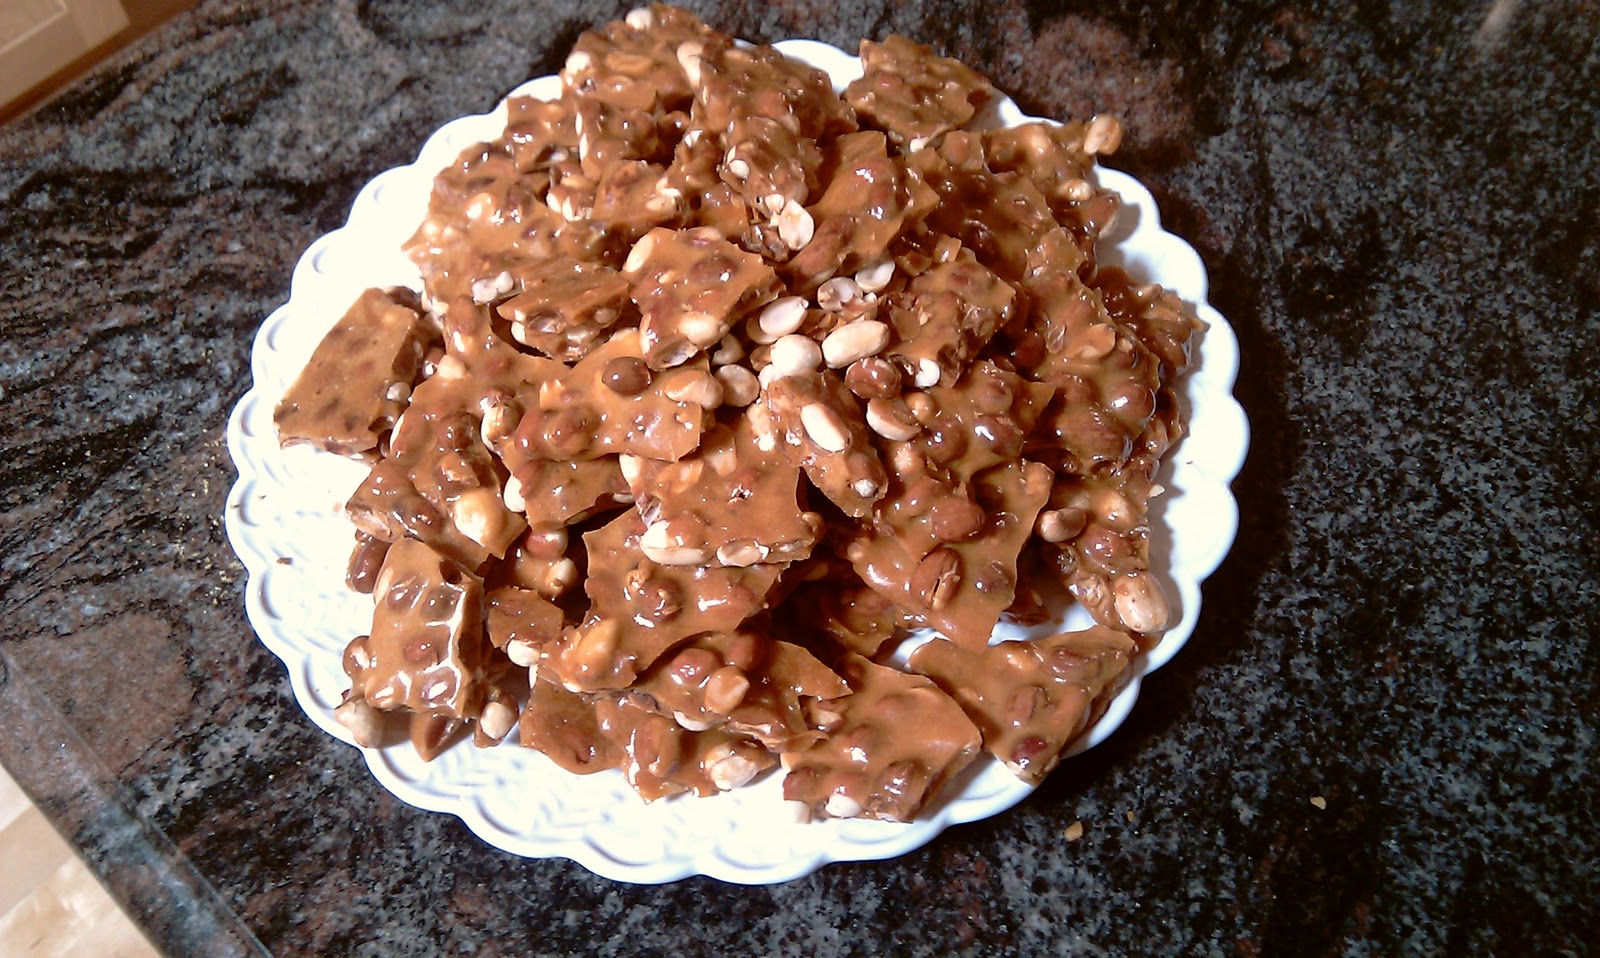
I made this peanut brittle recipe today, it is from the family cookbook I made a while back. It is from my cousin Donna Wrfight, who I think got it from the Joy of Cooking... Let me say it BLOWS AWAY the Sees peanut brittle if you are a fan... here is a photo, and the recipe follows. It calls for 1 lb of peanuts. This makes a very peanutty brittle... you could use 1/2 pound and be fine. I have also made it with other nuts and it is just as good. Try your own version using macadamias, marcona almonds, pecans, pistacios, cashews, whatever nuts are your favorite. I make one batch at a time, because the pot I have boils over when I add the baking soda mixture if I double it... so beware of the foaming in the end....
I will be posting more family favorite holiday recipes all this month, so check back.... or subscribe and follow me on facebook....
Happy Holidays!
Ingredients:
1 ½ tsp baking soda
1 tsp water
1 tsp vanilla
1 ½ cups sugar
1 cups light corn syrup
1 cup water
3 Tbspns butter
1/2 lb shelled unroasted peanuts (I have used the roasted salted ones too and it comes out fine)
Butter 2 cookie sheets and set aside.
Mix baking soda, vanilla and 1 tsp water together, set aside
Mix sugar, water and corn syrup together in 3 qt saucepan. Cook over medium heat stirring occasionally until 240 degrees or soft ball stage. Stir in butter and then peanuts. (recipe calls for 1 lb but I use a ½ lb and make a double batch that way I get more and it is still just as good) Continue cooking to 300 degrees, or hard crack stage. Be careful as it can burn easily at this stage… remove from heat and add in vanilla baking soda mixture. Candy will foam up and double in volume as well as darken, quickly spread out on cookie sheets and stretch with wooden spoon to desired thinness. You must work fast. Allow to cool. Break into pieces and serve. Can be stored in an airtight bag for 2 weeks.
Thursday, December 9, 2010
Ode to my uterus
Aunt Mary we affectionately called her here in our house... her and her monthly visits. She loved to go on trips, and always managed to show up just as we were leaving so she could tag along for most of it., She had a rocky start in the early years as a teen. We had endometriosis and a couple of surgeries, and wondered if we could even carry a baby... But like the little engine that could... she chugged along in spite of the doctors warnings. She provided me with four awesome kids. She and I survived induced labor, pitocin and no epidural (ouch) and a beautiful quiet easy breezy natural delivery without a doctor for the first half of delivery. We had our water broke, and she hung in there like a champ as she pushed baby number 3 out with one push. She was poked and prodded and cut open with a c-section when baby number 4 decided she liked her butt tucked snugly under my pelvic bone. She watched her friends Fallopian Tubes and Ovaries say a final goodbye, as I debated with the doctor over tying both tubes or only doing one and rolling the dice. I wish I had been a gambler. She worked very hard to help 3 different couples become a family through surrogacy. She did her part, but their eggs just weren't healthy enough to implant in her......
Then a few months ago, I started noticing she was tired... worn out, and literally falling out of me... Poor Mary. We had a good run... Wish I could have put you up in a hammock with a mai tai and let you retire in style... but we had to part... you and I... I will miss you. You were very good to me. I will remember you fondly. I never thought of you as a curse. I celebrated every single time you visited. and also the times you didn't.. I wish you well Mary. Rest In Peace....
Monday, December 6, 2010
Classes with the Fabulous Katherine England
So I took some classes this past weekend at Katherine England's studio in Fullerton. She is such a sweet person. Spent Saturday doing a fused glass class, and Sunday making a Wizard of Oz journal. Learned some great techniques and made some really cool stuff. If you are ever in the area and want to take a fun class, check her out... http://www.katherineengland.com/ I am planning taking some of the classes next year.
The journal was a color copy of the book front and back, glued to birch boards 1/4 inch thick. We used PVA and a credit card to stick it down, and then minwax polycrylic to seal it. Then we used the 140 lb watercolor paper sheets to make 6 signatures, and sewed it together using the coptic stitch technique. She gives you all the materials you need to make the book. I would suggest if you want to add jewels and bling bling to the stitches, you bring that along with you. I bought this sparkly red faux leather at the fabric store with one of those... "I don't know what I will use it for but I am getting it anyway" kind of moments... and LOVE how the sparkly red looks on the spine.
The houses were all made with Dichroic glass. I cut and nipped the pieces, and made a holy ton of houses for a future mosaic piece. I also experimented with making pendants, sandwiching 2 pieces of glass, dichro to dichro with clear on top, and got some pretty cool results. I can't wait to get more and make a ton more things. I want to make pendants for my etsy shop... I have some steampunk themed ideas rolling around in my head that would be really cool....
Tuesday, September 21, 2010
Surrendering
Remember when we were kids and would play tag or capture the flag and you would hate to be the kid who yelled "I surrender!" because it made you the "loser"? I have been experiencing these "loser" feelings a lot lately... Buckling under the weight of all the things I need to do, but have yet to accomplish, I feel overwhelmed. In a new town with absolutely no friends... Alone in ways I have never experienced before, I am faced daily with medical issues, doctor visits, insurance company and attorney phone calls... Some days, it is hard to get out of bed... I was trying to remember if I have ever felt like this before, and then I remembered the post partum depression I experienced with Kayleigh... No... It couldn't be THAT... not the D word... But then I just let go once I recognized it... It is depression... It is a lot of things, all rolled into a big ball of surrender... and I think that is what is depressing me... The surrendering... as if by surrendering to my life and my current limitations, I am a loser... Intellectually I know this is not the case... But the fighter in me says, "that's it, it's all over once you surrender.."
Will the world stop turning if I don't get my boxes unpacked? Will the art supplies shrivel up and blow away waiting for me to use them? Can a person actually die from too many unexpressed creative ideas? These questions haunt me, and keep me awake all night... What I really need right now is some grandma therapy... When I was a teen ager and feeling blue, I would visit my grandma, and tell her all my troubles... she always had wise advice on how to help me, and if she couldn't think of anything else to say, she would put her arm around me and pat my back and say, "then just have a good cry, let yourself really feel it... you will feel better." So here I sit, a box of permission slips (tissue) on the table next to me... trying to have a good cry... I have my grandma's permission.... and I feel like if I start to cry... I might crack apart and never stop...
I feel blocked at every turn... In more ways than I even want to put out there into the world in print... but some, like decorating my home, getting organized, creating a nurturing environment for my family, starting the Christmas gift making, and creating my "Creative Business" I started so many moons ago and never finished... these are the things that frustrate the hell out of me... because all these physical limitations and other things are happening that prevent me from doing the things that are literally BURNING in my soul to do... And every time I come up with a solution, it involves getting or hiring help, and that appears to not be an option.... So I am stuck here... Knowing I need to just give up and let it go for a while, and refusing to let go because then I will be a loser...
I am trying a new tactic today... Little by little, every single day, I will try to create one thing in my life that is a step toward the life I want... I can see it so clearly, what it looks like, what it feels like, even what it tastes and smells like... So instead of focusing on how far away it is, I will focus on how much closer I am getting to it every day. Accepting myself the way I am now, and embracing my limitations is a step in the right direction. Taking the time to nurture myself and care for my poor body right now when it really needs some kindness and love is another step... Doing little, manageable projects that I can accomplish on my own, will give me a sense of satisfaction, and quiet the creative whispers that are becoming screams in my heart. I can only do what I can do, which is my best... the rest will just have to wait... and every day I repeat these words to myself over and over....
"What God leads us to... He leads us through...." I saw it on a church billboard here in town the other day... and it really jolted me... So I am surrendering it all to God... I am letting Him handle the details for me, because it is just too big a job for me on my own right now...
Will the world stop turning if I don't get my boxes unpacked? Will the art supplies shrivel up and blow away waiting for me to use them? Can a person actually die from too many unexpressed creative ideas? These questions haunt me, and keep me awake all night... What I really need right now is some grandma therapy... When I was a teen ager and feeling blue, I would visit my grandma, and tell her all my troubles... she always had wise advice on how to help me, and if she couldn't think of anything else to say, she would put her arm around me and pat my back and say, "then just have a good cry, let yourself really feel it... you will feel better." So here I sit, a box of permission slips (tissue) on the table next to me... trying to have a good cry... I have my grandma's permission.... and I feel like if I start to cry... I might crack apart and never stop...
I feel blocked at every turn... In more ways than I even want to put out there into the world in print... but some, like decorating my home, getting organized, creating a nurturing environment for my family, starting the Christmas gift making, and creating my "Creative Business" I started so many moons ago and never finished... these are the things that frustrate the hell out of me... because all these physical limitations and other things are happening that prevent me from doing the things that are literally BURNING in my soul to do... And every time I come up with a solution, it involves getting or hiring help, and that appears to not be an option.... So I am stuck here... Knowing I need to just give up and let it go for a while, and refusing to let go because then I will be a loser...
I am trying a new tactic today... Little by little, every single day, I will try to create one thing in my life that is a step toward the life I want... I can see it so clearly, what it looks like, what it feels like, even what it tastes and smells like... So instead of focusing on how far away it is, I will focus on how much closer I am getting to it every day. Accepting myself the way I am now, and embracing my limitations is a step in the right direction. Taking the time to nurture myself and care for my poor body right now when it really needs some kindness and love is another step... Doing little, manageable projects that I can accomplish on my own, will give me a sense of satisfaction, and quiet the creative whispers that are becoming screams in my heart. I can only do what I can do, which is my best... the rest will just have to wait... and every day I repeat these words to myself over and over....
"What God leads us to... He leads us through...." I saw it on a church billboard here in town the other day... and it really jolted me... So I am surrendering it all to God... I am letting Him handle the details for me, because it is just too big a job for me on my own right now...
Monday, August 2, 2010
Healing Journal Day 1 (how to make it)
I took this Dollar Store journal filled with brown paper, and flipped it over so the pattern on the cover wouldn't show through the semi transparent fabric.
Then I deconstructed my daughters t-shirt so I had a front, back and sleeves.
I put a generous coat of heavy gel medium on the cover, pressed the fabric on to the book board, then flipped it over.
Using more gel medium around the edges, I folded the extra around the edge, being careful to make sure the corners stayed really flat. I then took one of the book pages from the book, lined it up with the holes and covered it with gel medium, sticking it down over the inside of the cover. This gives you a very nice custom finished look.
Here is my finished journal, ready to be hole punched through the fabric in the existing holes, and tied with some cool fibres I have... This project is very easy, and the cool part is, if you mess it up, pull it off and do it again. This one took me 10 minutes start to finish including taking the photos. You can use old book boards if you want, just be sure to cut a strip 1/2 inch thick and the same length as the book board before covering with fabric. This will allow you to open the book without damaging pages or the cover.
Subscribe to:
Posts (Atom)